5: Preferences

5.1: Note
5.2: PreSet
5.3: Device
5.4: Analyze
5.5: Display
5.6: Internet
5.7: Brain peak MIDI
5.8: Brain rhythm MIDI
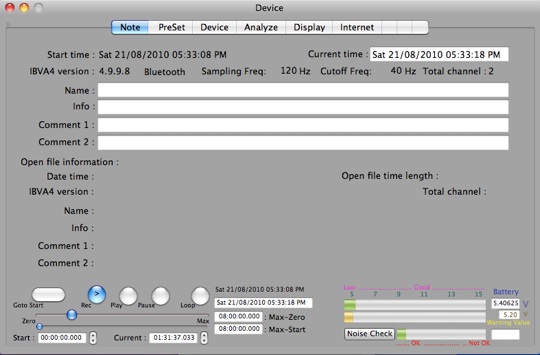
5.1: Note
Use for make note, control recording and play back mode.
Click small triangle (Left Top side of window) makes window to close.
Battery info shows only for Bluetooth IBVA.
Start time slider (bottom slider) works when loop mode and when save, open brain data file.
example: Start : 00:10:29, Time: 00:20:56 then save file makes a file in this time range.
example: Start : 00:10:29 then open file makes add open file to after Start time.
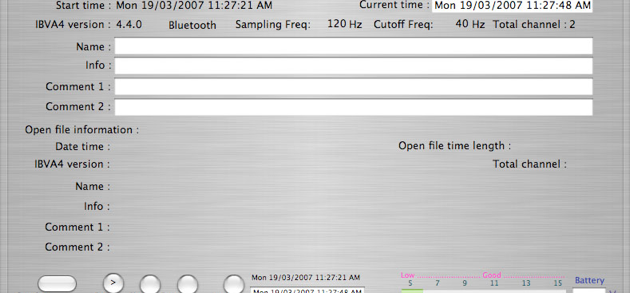
5.1.1: Start time and Current time
When you run IBVA4 for the first time, the Start time and Current time is the same.
Start time stops when you start recording and/or play and/or when current time point is not 00:00:00 (hh:mm:ss).
5.1.2: Max recording time
Max recording time: Default is 01:00:00 mean 1 Hour. Menu “Recording/Max Time->“ adjusts Max recording time.
5.1.3: Goto Beginning, Rec, Play, Pause, Loop
Recording monitor and control: Default start mode for "Rec" is "ON" at start point 00:00:00.
Click "Goto Beginning”: go time point to Start time ( 00:00:00 in this case).
Loop mode makes go back to time point to Start time ( 00:00:00 in this case ).
Slider can move current time point.
Start time slider (bottom slider) works when loop mode and when save, open brain data file.
example: Start : 00:10:29, Time: 00:20:56 then save file makes a file in this time range.
example: Start : 00:10:29 then open file makes add open file to after Start time.
5.1.4: Name, Info, Comment 1, Comment 2 filed
Name, Info, Comment 1, Comment 2 field is where you can type information to make a record of this experience.
Open file information filed shows when open "Brain Note" file, which was created with IBVA4.
* Save Brain Note file for long recording time is recommended: do not open many windows simultaneously and do not run many applications simultaneously.
* Current version IBVA4 V4.0.8 Max recording time is 04:00:00. This image is to test.
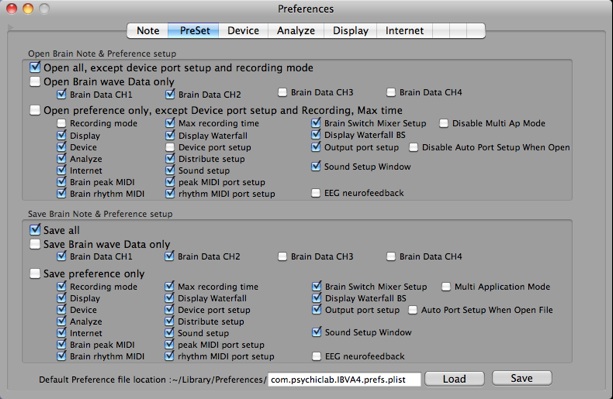
5.2: PreSet
Use this window to modify the Save file information and Open file mode.
5.2.1: Open Preferences setup and Save Preference setup
Default is "Open all, except device port setup and recording mode" in the Open Preference setup section,
and "Save all" in the Save Preference setup section.
5.2.2: Automatic port setup
After you run IBVA4, you need to setup this window to turn on "Device USB port setup" and "Max recording time" in the Open Preference setup section.
Then Open a Brain Note file. All USB port setup is done automatically with the setup information in the Brain Note file open.
Then you can start to record brain waves from time point 0 to max recording time. This max recording time is the length of saved data for the opened Brain Note file.
5.2.3: Automatic port setup and recording mode setup
After Run IBVA4, setup this window to turn on "Device USB port setup", "Max recording time" and "Recording mode" in the Open Preference setup section.
Then Open Brain Note file. All USB ports and the recording mode setup will be done automatically with the setup information from the Brain Note file open.
Then you can start to record brain waves from time point at the same time point as the file created. Max recording time is also the same as the file created. This way will continue to record, save, open, record save.... into the same Brain Note file.
In case you save file with "Pause" mode, then open this file with this Preset setup, then start with "Pause" mode. Click "Rec" to start recording from that time point.
5.2.3: Automatic MIDI port setup
After running IBVA4, setup this window to turn on "peak MIDI port setup" and/or "rhythm MIDI port setup" in the Open Preference setup section.
Then open your Brain Note file. All MIDI port setup is done automatically with the setup information for the Brain Note file which open.
5.2.4: Open Brain wave data only
After Run IBVA4, setup this window to make on "Open Brain wave data only".
Then open a Brain Note file. Open Brain wave data only. No preferences are effective.
5.2.5: Open preferences only, except Device USB port setup, MIDI port setup and Recording, Max time.
After Run IBVA4, setup this window to turn on "Open preferences only". Then Open a Brain Note file, to open preferences only, except Device USB port setup, MIDI port setup and Recording, Max time. No Brain wave data in the data buffer is effective.
5.2.6: Save Brain wave data only
Save Brain Note file creates a file only containing brain wave data. No preferences are saved.
5.2.7: Save preferences only
After Run IBVA4, setup this window to turn on "Open preferences only".
Save Brain Note file makes a preference file only. No Brain wave data will be saved.
This keeps file sizes small.
* In case you change USB connection setup or run it on another Mac, then DO NOT TURN ON "Device USB port setup".
* Time taken to open a 1-hour and 2 channel Brain Note file is about 15 to 30 seconds, depending on speed of your Mac.
* 1 hour 2 channel brain data file is about 12 MB. File save time is 60 second.
5.2.8: Auto Port Setup When open File
“Auto Port Setup When open File”.
In case check this option then save brain data, then open this brain data file makes same port setup and settings and start to record brain wave. not play brain data. Works same as select
File / Open as ... / Preference Only With Port and Recording Mode Setup menu.
In case like to open this data file without setup Port then need to check “Disable Auto Port Setup When Open” then open file.
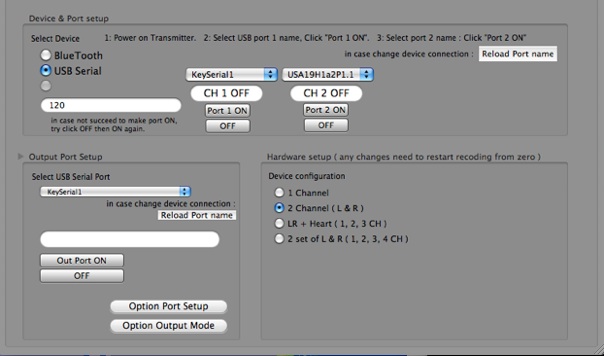
5.3: Device
IBVA hardware Device setup and configuration.
5.3.1: Device & Port setup.
USB serial IBVA hardware setup and configuration. ( Only use for original IBVA )
For Channel 1 setup:
Select USB port 1 name by using the left popup menu. Click "Port 1 ON", you need to wait a few seconds for the receiver to start-up.
Then it will show "Port 1 initialized successfully" in the Message field, and show "CH 1 ON".
You will see the red LED is now ‘ON’ one of the receivers.
For Channel 2 setup:
Select the name of your USB port 2 by using the left popup menu. Click "Port 2 ON", you need to wait a few seconds for receiver to start-up.
Then it will show "Port 2 initialized successfully" in the Message field, and show "CH 2 ON".
You will see the red LEDs are now 'ON' for both of the receivers.
For other Device configuration, repeat setup.
5.3.2: IBVA Hardware setup / Device configuration
Select "1 Channel", or "2 Channel", or "LR + Heart (1, 2, 3 CH), or "2 set of L & R (1, 2, 3, 4 CH)" in the IBVA Hardware setup.
Default is "2 Channel".
* In case you cannot see the message "... initialized successfully", or the red LED at receiver does not turn ON, you must check the USB serial adapter connection, cable connection,
USB serial adapter device driver installation. Some company’s USB serial adapters do not work correctly with all Mac OSX versions.
Check with the manufacturing company’s website to download a new driver software.
* Port name depends on USB serial adapter manufacturer and your Mac system.
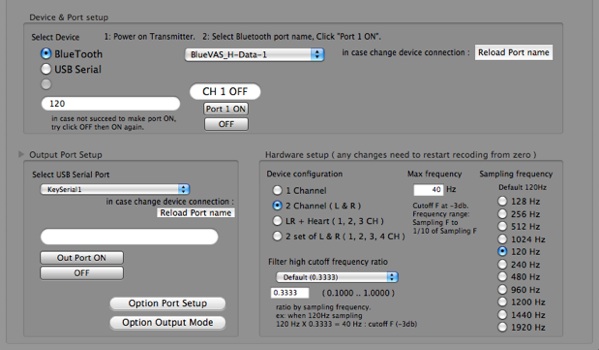
5.3.3: BlueTooth IBVA Hardware Device & Port setup.
Following function works only new Bluetooth IBVA system.
Sampling frequency: set sampling frequency.
Max sampling is 960 Hz when 8 hours recording.
Max frequency: set filter cut off frequency at -3db.
frequency range : sampling frequency to 1/10 of frequency.
ex : when 120 Hz sampling, 12 Hz to 120 Hz is filter cut off frequency.
Filter high cutoff frequency ratio.
Default is 0.3333.
range is 0.1000 .. 1.0000
ratio by sampling frequency.
ex : when 120 Hz sampling -> 120 Hz X 0.3333 = 40 Hz cutoff frequency
Device configuration: setup Device channel number,
Filter high cutoff frequency ratio: set up high cutoff frequency ratio for internal Filter
Max frequency: setup Max frequency for internal Filter
Sampling frequency: setup Sampling frequency
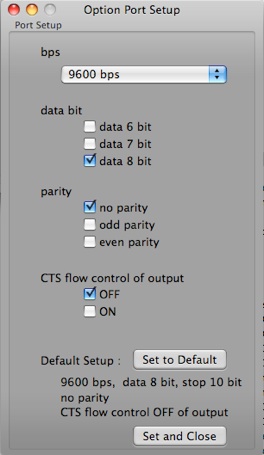
5.3.4: Output Port Setup
Select USB Serial Port.
then click “Out Port ON” to activate selected Port.
Click “OFF” to make Port OFF.
Click “Option Port Setup” shows Port Setup : bps, data bit, parity & CTS flow control
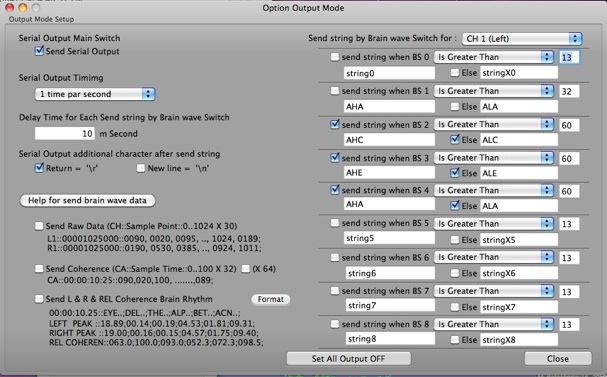
Click “Option Output Mode” shows Output Mode setup window.
Send Serial Output:
check this start send serial data to selected output port.
Serial Output Timing.
1 time par second, etc.
Delay Time for Each Send string by Brain wave Switch.
0 m Second.
Serial Output additional character after send string
Send Raw Data
Send Coherence
Send L & R & Coherence Brain Rhythm
Send string by Brain wave Switch
Send string when BS 0 .. 8 with condition.
in case check “Else” then send string when not condition.
5.4: Analyze
Analyze setup to make DC / AC filter for display, Gain select, Coherence calculation level, FFT POINT and FFT Window setup.
5.4.1: Filter mode
AC DC CUT: Turn on and select the frequency range
Coherence calculation level: coherence calculation up to selected power level.
Show Reverse Polarity to Play display:
Coherence shows 0..90 degree phase. In case phase is over 90 to before 360 degree then coherence shows 0 %, this mean 1/4 phase can see as coherence.
Use this option setup, show same L channel wave to CH 3, and R channel wave make 180 degree phase to CH 4 as play mode display in the Brain wave display window. ( only brain wave display window ). When select Play mode display then shows 180 degree Polarity sift wave. This way easy to see coherence difference between not phase shift and 180 degree phase shift at once. this mean 1/2 phase can see as coherence.
This setup is only for Live recording brain wave. Also can not play brain wave in the play mode display.
Set Revers Polarity for Brain wave and Sound wave.:
Use this Revers Polarity setup makes 180 degree phase between L & R channel to eliminate 180 degree phase difference. When use “ Show Reverse Polarity to Play display:” no need to set this option for Brain wave.
additional info for coherence:
http://web.mac.com/mkahata/IBVA/Coherence.html
Display gain select: Display gain will change for each channel. Does not affect the recorded brain wave data.
5.4.2: Calculation mode
Calculation: Real time, Average over time, auto gain for power.
Log power: select log power makes display with LOG calculation.
No peak Calculation, and calculate mode select.
5.4.3: FFT setup
FFT POINT: select FFT point. Default is 512 point FFT
Window select: select FFT windows. Default is Hamming
FFT Power calculation: select FFT power calculation mode. p-p Windowing calibration.
5.5: Display
Setup display mode.
5.5.1: Raw wave
Raw wave Window display: Turn on to show the raw wave Window display
Auto gain: auto gain by selected mode
Grid Colour: click to select Grid colour
set default window alpha
5.5.2: 2D Bar graph
Show Grid: makes the grid visible, select size and colour
Show Peak Hold: shows peak hold image
Peak hold image size by selecting the popup menu, colour select
Peak hold mode select
set default window alpha
5.5.3: 3D Water Fall
Select colour animation mode and colour.
P colour uses the same colour for frequency.
F colour uses a different colour for frequency.
Show Text: shows text.
set default window alpha
5.5.4: 3D Water Fall BS Mixer
Select colour animation mode and colour
P colour uses the same colour for frequency.
F colour uses a different colour for frequency.
Show Text: shows text.
Draw Bothside: draw FFT Water Fall graph for both side. In case this is turned ‘off’ the display speed will increase.
Select BS peak mode and peak mode in the FFT Water Fall graph.
Select colour map for BS peak, peak and FFT Water Fall graph
set default window alpha
5.5.5: Quick Time Movie
set default window alpha
5.5.6: Cubic Tunnel
set default window alpha
5.5.7: Brain Skyfly
set default window alpha
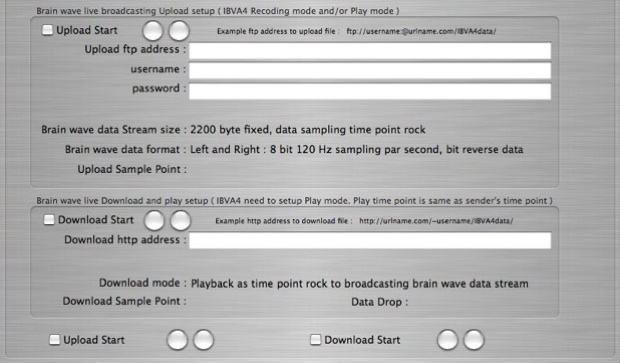
5.6: Internet
Setup internet connection.
This function works 3 to 15 min only that depend on internet connection condition.
To do following process need to make internet connection ON that use "Internet Connect" application.
Upload brain wave:
type "Upload ftp address" : "ftp://xxx:@yyy.com/IBVA4data/
this mean brain wave data will up to IBVA4data folder in the yyy.com at user name xxx.
type "username" and "password".
then click "Upload Start". in case upload succeed then "OK" will show ON.
To upload brain wave need to set up IBVA4 as record mode (live mode).
to stop Upload, un check "Upload Start".
Download brain wave:
type "Download http address" : "http://yyy.com/~xxx/IBVA4data/
this mean brain wave data will down load from IBVA4data folder in the yyy.com/~xxx/.
no need to use "username" and "password" permission for this process.
then click "Download Start". in case download succeed then "OK" will show ON.
To see brain wave need to set up IBVA4 as play back mode.
to stop download, un check "download Start".
some case need to re setup play time point to see brain wave.
Set play time point about 5 to 10 second before is safety to see brain wave.
*********
Receive brain wave data is time sync from sender's time point.
From sender, IBVA4's recording time is 01:23:45 (upload brain wave data and time),
then
Receiver IBVA4's play back time is also 01:23:45 (down load brain wave data and time),
About 2..5 second difference in-between sender and receiver.
*********
Depend on Internet connection speed and condition, some part of receive brain wave data may lost.
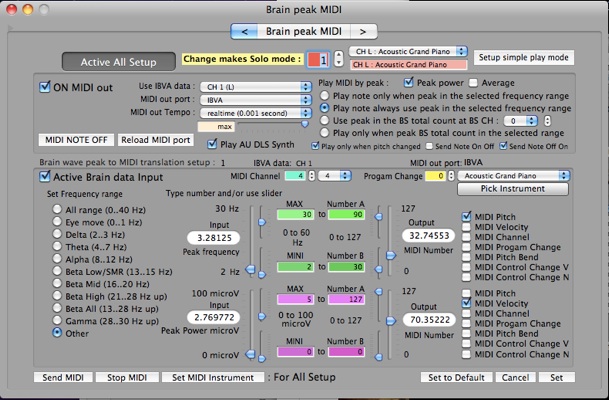
5.7: Brain peak MIDI
click "Brain peak MIDI" in the "Preferences".
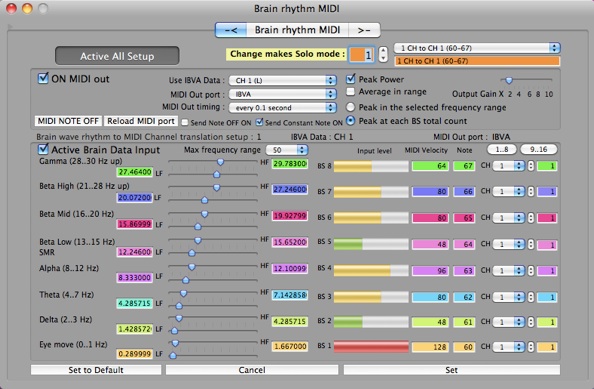
5.8: Brain rhythm MIDI
click "Brain rhythm MIDI" in the "Preferences".
© Psychic Lab Inc. Masahiro Kahata 2005, 2006, 2008, 2009, 2010
5: Preferences